2. ライブラリ追加方法
2.1. プロジェクトへ追加する
ライブラリはCocoaPodsとFrameworkに対応しています。 アプリケーション構成に合わせてライブラリを追加してください。
ライブラリについて、最新のSDKを スター精密グローバルサポートサイト からダウンロードしてご確認ください。
2.1.1. CocoaPodsを使用する場合
以下のコードをPodfileに挿入します。
pod 'StarIO', 'StarIOVersion'
pod 'StarIO_Extension', 'StarIOExtensionVersion'
pod 'StarIODeviceSetting', 'StarIODeviceSettingVersion'
注釈
ライブラリの最新バージョンはSDK内のPodfileを参照ください。
以下のコマンドを実行します。
pod install
2.1.2. 手動でリンクする場合
Build Phases タブの"Link Binary With Libraries"に StarIO.xcframework を追加します。
Build Phases タブの"Link Binary With Libraries"に StarIO_Extension.xcframework を追加します。
Build Phases タブの"Link Binary With Libraries"に StarIODeviceSetting.xcframework を追加します。
General タブの"Frameworks, Libraries, and Embedded Content"のEmbedを以下のように設定します。
StarPRNT SDK Version |
StarIO |
StarIO_Extension |
StarIODeviceSetting |
V5.17.1 以降 |
Embed & Sign |
Embed & Sign |
Embed & Sign |
V5.16.0 - V5.17.0 |
Embed & Sign |
Embed & Sign |
Do Not Embed |
V5.15.1 以前 |
Do Not Embed |
Do Not Embed |
Do Not Embed |
必要なフレームワークをプロジェクトに追加
CoreBluetooth.framework
ExternalAccessory.framework
注釈
StarIODeviceSetting.xcframeworkを使用する場合は、StarIO.xcframeworkを併せてリンクしてください
2.2. Information Property List へ項目を設定
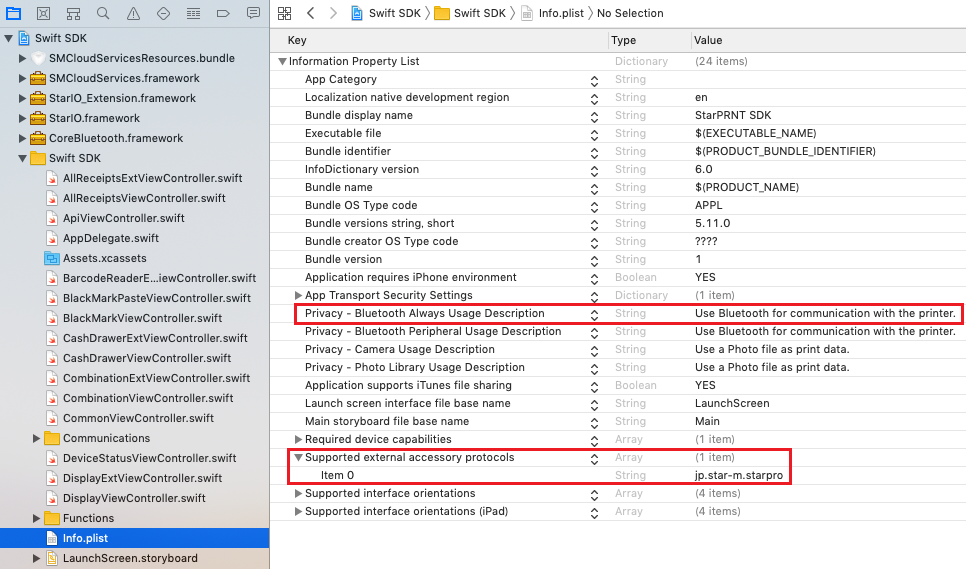
2.2.1. Supported external accessory protocols の設定
Bluetoothプリンターを使用する場合
警告
Bluetooth プリンタを使用しない場合は、この設定を行わないでください。
Information Property List(デフォルトでは"Info.plist")を選択します。
Keyに
Supported external accessory protocolsを追加します。項目名左側の▽をクリックして表示される"Item 0"の[Value]に
jp.star-m.starproを設定します。
2.2.2. Bluetooth Always Usage Description の設定
iOS13以上でBluetooth Low Energyプリンターを使用する場合
Information Property List(デフォルトでは"Info.plist")を選択します。
Keyに
Privacy – Bluetooth Always Usage Descriptionを追加します。Value に Bluetoothの利用目的(例:
Use Bluetooth for communication with the printer.)を設定します。iOS13以上でBluetooth Low Energyにてプリンターと通信するとき、Bluetoothへのアクセス許可を求めるダイアログが表示されます。その際、Valueに設定した文字列がBluetoothを利用する理由として表示されます。
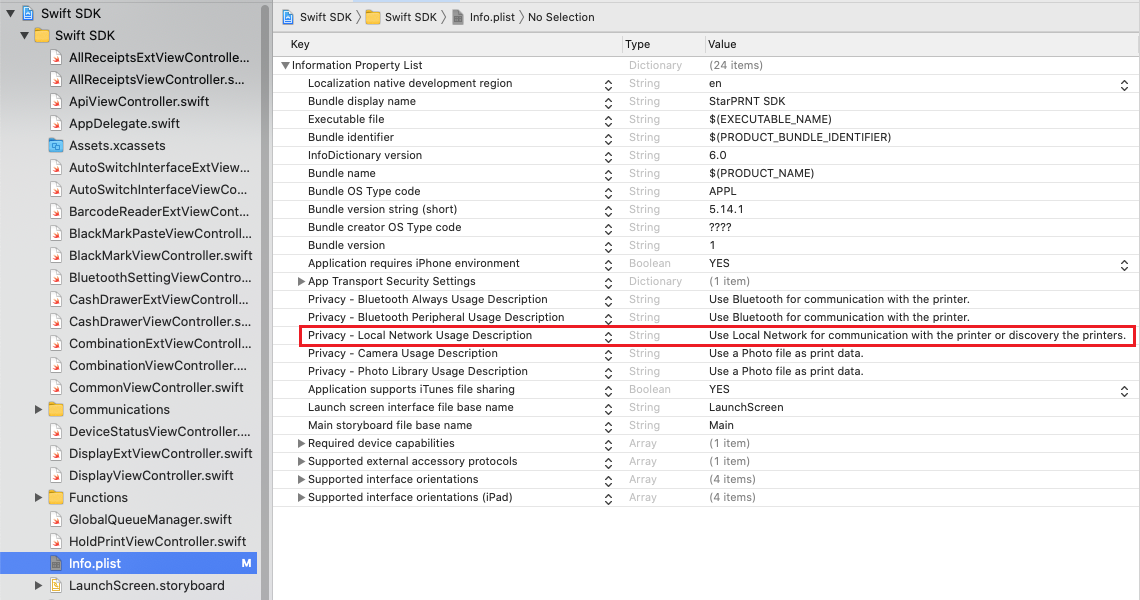
2.2.3. Local Network Usage Description の設定
iOS14以上でEthernetプリンターを使用する場合
Information Property List(デフォルトでは"Info.plist")を選択します。
Keyに
Privacy - Local Network Usage Descriptionを追加します。Value に Local Networkの利用目的(例:
Use Local Network for communication with the printer or discovery the printers.)を設定します。iOS14以上でEthernetプリンターと通信するとき、Local Networkへのアクセス許可を求めるダイアログが表示されます。その際、Valueに設定した文字列がLocal Networkを利用する理由として表示されます。
2.3. Objective-C Bridging Header の追加
Swiftで開発する場合
提供するフレームワークはObjective-Cで作成されています。 そのため、Swiftからアクセスする場合は、プロジェクトにObjective-C Bridging-Headerの追加が必要です。
Xcodeメニューの File -> New -> File... を選択します。
Header File を選択し、 Next をクリックします。
任意の名前を入力し、 Create をクリックして空のヘッダファイルを作成します。 以下の例では、ヘッダファイルの名前を"StarIO_Extension-Bridging-Header.h"とします。
3.で作成したヘッダファイルに以下のimport文を記載します。
#import <StarIO/SMPortSwift.h>

#import <StarIO_Extension/StarIoExt.h>
#import <StarIO_Extension/StarIoExtManager.h>
#import <StarIO_Extension/SMBluetoothManagerFactory.h>
#import <StarIO_Extension/SMSoundSetting.h>

// To use StarIODeviceSetting.xcframework, you also need to write the following lines.
#import <StarIODeviceSetting/StarIODeviceSetting.h>
Build Settingsの Objective-C Bridging Header 項目に、3.で作成したヘッダファイルへのパスを指定します。
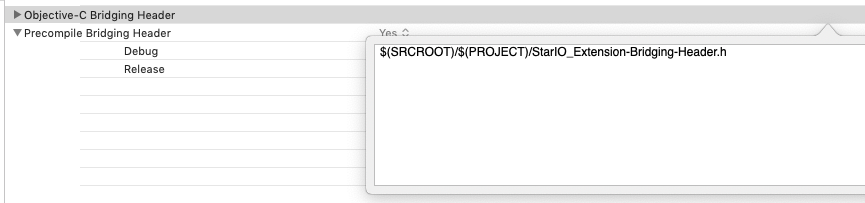
上記手順により、Swiftから各フレームワークへのアクセスが可能になります。