1. Getting Started
To build a project, Xcode is needed.
Please make sure that you have Visual Studio installed on your PC used for development.Should you need assistance or additional information, visit the Xcode - Support - Apple Developer .
StarPRNT SDK V5.20.0 has checked this using Xcode 16.0.
1.1. Operating System
iOS 14.0 or later
1.2. Printer
Printer |
Firmware version |
Interface |
Emulation |
Library version |
|---|---|---|---|---|
| mC-Print2 | 2.2+ | Bluetooth | StarPRNT | StarIO: 2.4.0+ |
| Ethernet | ||||
| USB | ||||
| mC-Print3 | 2.2+ | Bluetooth | StarPRNT | StarIO: 2.4.0+ |
| Ethernet | ||||
| USB | ||||
| mC-Label2 | 1.0+ | Bluetooth | StarPRNT | StarIO: 2.12.0+ |
| Ethernet | ||||
| USB | ||||
| Wireless LAN | ||||
| mC-Label3 | 1.0+ | Bluetooth | StarPRNT | StarIO: 2.10.0+ |
| Ethernet | ||||
| mPOP | 1.0+ | Bluetooth | StarPRNT | StarIO: 2.2.3+ |
| 4.0+ | USB | |||
| FVP10 | 1.2+ | Bluetooth | StarLine | StarIO: 2.2.3+ |
| Ethernet | ||||
| TSP100IV | 1.0+ | Ethernet | StarPRNT | StarIO: 2.8.2+ |
| Bluetooth | StarIO: 2.12.0+ | |||
| Wireless LAN | ||||
| TSP100IV SK | 2.0+ | Ethernet | StarPRNT | StarIO: 2.8.2+ |
| Bluetooth | StarIO: 2.12.0+ | |||
| Wireless LAN | ||||
| TSP100IIIW | 1.0+ | Wireless LAN | StarGraphic | StarIO: 2.2.3+ |
| TSP100IIILAN | 1.0+ | Ethernet | StarGraphic | StarIO: 2.2.3+ |
| TSP100IIIBI | 1.0+ | Bluetooth | StarGraphic | StarIO: 2.2.3+ |
| TSP100IIIU | 1.7+ | USB | StarGraphic | StarIO: 2.3.0+ |
| TSP100IIU+ | 1.0+ | USB[1] | StarGraphic | StarIO: 2.3.0+ |
| TSP100ECO | 2.0+ | USB[1] | StarGraphic | StarIO: 2.2.3+ |
| TSP100U | 2.0+ | USB[1] | StarGraphic | StarIO: 2.2.3+ |
| TSP100GT | 2.0+ | USB[1] | StarGraphic | StarIO: 2.2.3+ |
| TSP100LAN | 2.0+ | Ethernet | StarGraphic | StarIO: 2.2.3+ |
| TSP650II | 1.0+ | Bluetooth | StarLine | StarIO: 2.2.3+ |
| Ethernet | ||||
| TSP650IISK | 1.0+ | Bluetooth | StarLine | StarIO: 2.8.0+ |
| Ethernet | ||||
| TSP700II | 5.0+ | Bluetooth | StarLine | StarIO: 2.2.3+ |
| 3.0+ | Ethernet | |||
| TSP800II | 2.0+ | Bluetooth | StarLine | StarIO: 2.2.3+ |
| 1.2+ | Ethernet | |||
| BSC10II | 3.0+ | Ethernet | StarPRNT[8] | StarIO: 2.11.1+ |
| BSC10 LAN | 1.0+ | Ethernet | EscPos | StarIO: 2.2.3+ |
| SP700 | 4.0+ | Bluetooth (EU / USOnly) |
StarDotImpact | StarIO: 2.2.3+ |
| 3.0+ | Ethernet | |||
| SM-S210i | 2.4+ | Bluetooth | StarPRNT[2] | StarIO: 2.2.3+ |
| EscPosMobile | ||||
| SM-S220i | 2.0+ | Bluetooth | StarPRNT[2] | StarIO: 2.2.3+ |
| EscPosMobile | ||||
| SM-S230i | 1.0+ | Bluetooth | StarPRNT | StarIO: 2.2.3+ |
| EscPosMobile | ||||
| SM-T300i | 2.4+ | Bluetooth | StarPRNT[2] | StarIO: 2.2.3+ |
| EscPosMobile | ||||
| SM-T300 | 1.1+ | Bluetooth | StarPRNT[2] | StarIO: 2.2.3+ |
| EscPosMobile | ||||
| SM-T400i | 2.4+ | Bluetooth | StarPRNT[2] | StarIO: 2.2.3+ |
| EscPosMobile | ||||
| SM-L200 | 1.0+ | Bluetooth Low Energy | StarPRNT |
StarIO: 2.2.3+ StarIO: 2.10.2+[6] |
| StarPRNTL[3] | ||||
| SM-L300 | 1.1+ | Bluetooth Low Energy | StarPRNT | StarIO: 2.3.0+ |
| StarPRNTL[3] | ||||
| mC-Connect Drawer | 1.0+ | Ethernet | StarPRNT | StarIO: 2.12.0+ |
| Wireless LAN |
| [1] | USB interface printer works via an Apple Airport Express. |
| [2] | Support for StarPRNT emulation is SM-S210i, SM-S220i, SM-T300i and SM-T400i: firmware version 3.0 or later. SM-T300(DB): firmware version 4.0 or later. |
| [3] | Support for StarPRNTL emulation is firmware version 2.0 or later. |
| [6] | To use firmware version 4.0 or later. |
| [8] | When using in Standard Mode. |
Mobile Printer
When using StarPRNT emulation
To use the StarPRNT emulation, set the emulation setting of the printer to “StarPRNT”. To change the emulation, proceed as follows. (For SM-L200 and SM-L300, it does not need to switch the emulation.)
Turn the printer power and open the printer cover.
Press and hold the POWER button and the FEED button simultaneously. As soon as the ERROR lamp flashes five times, release the buttons. The emulation switchover takes place automatically.
After setting a paper, close the printer cover. The set emulation is printed out.
ESC/POS : EMU = ESC/POS
StarPRNT : EMU = StarPRNT
If the emulation is not switched correctly, repeat the above steps 1 to 3.At that time, in step 2, make sure not to release the buttons until the lamp completes the 5th flash.
Please reboot the printer after switching the emulation. *It will be valid after rebooting the printer.
1.3. Supported Peripherals
Supporting Peripherals |
Contents |
|---|---|
BCR-POP1 |
Barcode reader |
DS9208 |
Zebra Technologies (Symbol) barcode reader |
USB HID |
USB HID Class (Keyboard mode) |
SCD222U |
Customer display |
mC-Sound |
Melody speaker |
| BCR-POP1 | DS9208 | USB HID | SCD222U | mC-Sound | |
|---|---|---|---|---|---|
| mC-Print2 | ✔ | ✔ | ✔[2] | ✔ | - |
| mC-Print3 | ✔ | ✔ | ✔[2] | ✔ | ✔[1] |
| mC-Label2 | ✔ | - | ✔ | ✔ | - |
| mC-Label3 | ✔ | - | ✔ | ✔ | - |
| mPOP | ✔ | ✔ | ✔[4] | ✔[3] | - |
| TSP100IV | ✔ | ✔ | ✔ | ✔ | ✔ |
| TSP100IV SK | ✔ | ✔ | ✔ | ✔ | ✔ |
| [1] | Firmware version 1.3 or later is required. |
| [2] | Firmware version 3.0 or later is required. |
| [3] | Firmware version 2.0 or later is required. |
| [4] | Firmware version 3.0 or later is required. |
1.4. Connecting a printer to an iOS Device
1.4.1. Bluetooth
All Star Bluetooth devices have each initial device name as a factory default setting, such as “Star Micronics” and “DK-AirCash”. When using multiple devices, which have same device name, it is useful to change the device name for identifying each device easily.
You can change the LAN/Bluetooth settings of the Star POS device, such as changing the Bluetooth device name. Please use the Utility/Driver .
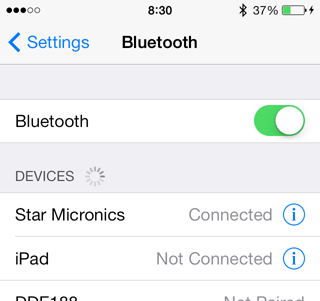
Pairing of a Star POS device with your iOS Device
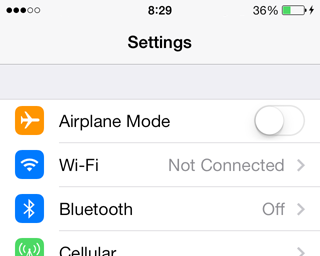
Ensure Bluetooth is enabled and the Star POS Device is powered on.
Tap Settings > Bluetooth.
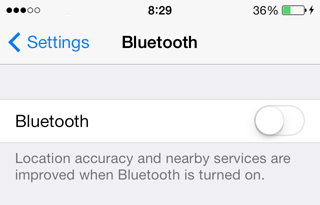
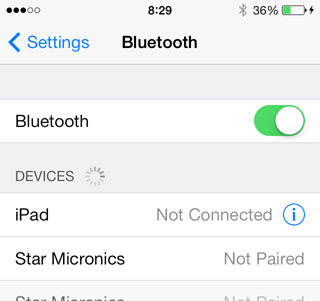
Tap Bluetooth to turn it on. Your iOS Device searches and displays the Bluetooth devices in range. Tap the Star portable printer you want to pair with.
If necessary, perform the following operation.
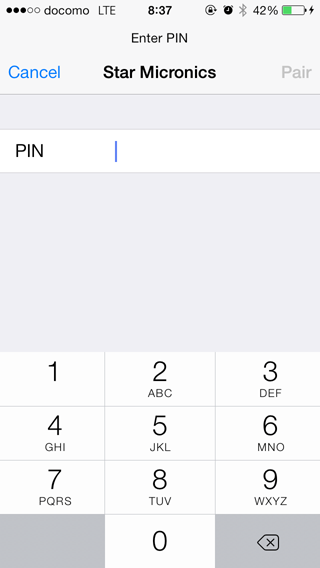
- Star POS Printer Bluetooth Security with PIN Code
- enter the PIN and tap Pair.
- Star POS Printer Bluetooth Security with SSP Numeric Comparison
- Compare the 6-digit authentication code displayed or printed on the printer with the one displayed on the iOS device to confirm that they match.If a match is found, pressing the FEED switch pairs them, and pressing the POWER switch cancels the paring.
When the pairing is complete, you’ll see this message.
How to change the Bluetooth Device Name
You can set up your POS Printers which can connect to TCP/IP. Please use the Utility/Driver .
To confirm iOS Port Name, select Settings -> General -> About after Bluetooth pairing is established.
The iOS Port Name will be shown under the Bluetooth address.
1.4.2. Ethernet / Wireless LAN Interface
Assign an IP Address to the Star Printer and connect it to the network.Standard Star Printers do not ship with an IP Address pre-assigned; this can set by a DHCP network.
Use Star POS Printers with the #9100 Multi Session disabled.The setting can be confirmed by Test Print which can be executed by holding down the printer’s feed button while turning the printer on.
Refer to “guidelines-ethernet_en.pdf” for how to confirm and change the #9100 Multi Session setting and how to set the Static IP Address.
You can set up your POS Printers which can connect to TCP/IP. Please use the Utility/Driver .
Star Quick Setup Utility and Star Setting Utility cannot be used with printers where an IP address has not been assigned (IP address 0.0.0.0).
This software uses TCP communication port 9100, TCP communication port 9100, UDP communication port 2222.
Assign an IP Address to the Star POS Devices and connect it to the network.
Tap Settings .
Ensure Wi-Fi is ON.
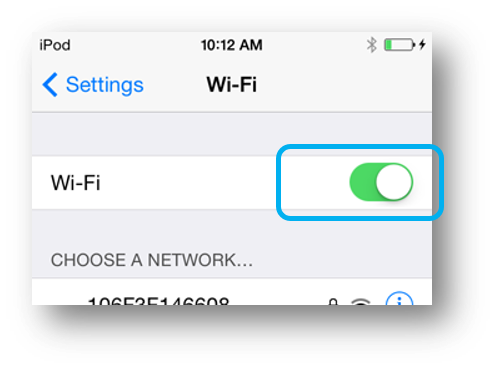
Connect to the same network the Star POS Device is on.
1.4.3. USB Interface
Connect the printer and the iOS device with a USB cable.
For usable models, refer to Star Printer Compatibility Chart.
How to debug the USB printer
Warning
The following descriptions, procedures and URL are subject to changes when Xcode versions upgrade or site updates. This document is based on our verification using Xcode 9.3 of MacOS 10.13.4 and iOS 11.3 on May 21, 2018. Refer to the Apple web site for the most recent information.
When using a USB printer, because the iOS Device USB port is used for the printer connection, it is not possible to install apps or debug using the USB cable.
However with Xcode 9 and iOS 11, wireless debugging can be used.
<Setup>
The iOS Device and mac must be connected to the same network.
Set a pass code for the iOS Device using the iOS Device “Settings” app.
Connect the iOS Device and mac using the USB cable.
Launch Xcode and select Window - Devices and Simulators.
Select the iOS Device to use in the left pane, and place a checkmark next to “connect via network”.
Thereafter, Xcode will display the iOS Device in the network even when it is not connected using the USB cable, allowing app installation and debugging.
1.5. Utility/Driver
Download from App Store , Google play , Star Global Support Site .
Software |
mC-Print2 | mC-Print3 | mC-Label2 | mC-Label3 | mPOP | FVP10 | TSP100IV | TSP100IV SK | TSP100IIIW | TSP100IIIBI | TSP100IIIU | TSP100IIU+ | TSP100ECO | TSP100U | TSP100GT | TSP100LAN | TSP650II | TSP650IISK | TSP700II | TSP800II | SM-S210i | SM-S220i | SM-S230i | SM-T300i/T300 | SM-T400i | BSC10II | BSC10 | SM-L200 | SM-L300 | SP700 | mC-Connect Drawer | |
|---|---|---|---|---|---|---|---|---|---|---|---|---|---|---|---|---|---|---|---|---|---|---|---|---|---|---|---|---|---|---|---|---|
| iOS/Android | Star Setting Utility[1] | - | - | - | - | - | ✔ | - | - | - | - | - | - | - | - | - | - | ✔ | ✔ | ✔ | ✔ | ✔[4] | ✔[4] | ✔[4] | ✔[4] | ✔[4] | - | - | ✔ | ✔ | ✔ | - |
| Star Quick Setup Utility | ✔ | ✔ | ✔ | ✔ | ✔ | - | ✔ | ✔ | ✔ | ✔ | ✔ | ✔ | ✔ | ✔ | ✔ | ✔ | - | - | - | - | - | - | - | - | - | ✔ | - | - | - | - | ✔ | |
| Star Kiosk (SK Series) Utility[2] | - | - | - | - | - | - | - | - | - | - | - | - | - | - | - | - | - | - | - | - | - | - | - | - | - | - | - | - | - | - | - | |
| Windows | StarPRNT Intelligence | - | - | - | - | - | ✔ | - | - | - | - | - | - | - | - | - | - | ✔ | ✔ | ✔ | ✔ | - | - | - | - | - | - | - | - | - | ✔ | - |
| Star Windows Software | ✔ | ✔ | ✔ | ✔ | ✔ | - | ✔ | ✔ | - | - | - | - | - | - | - | - | - | - | - | - | - | - | - | - | - | ✔ | - | - | - | - | ✔ | |
| StarPRNT Intelligence for Portable | - | - | - | - | - | - | - | - | - | - | - | - | - | - | - | - | - | - | - | - | ✔ | ✔ | ✔ | ✔ | ✔ | - | - | ✔ | ✔ | - | - | |
| StarPRNT Intelligence for BSC10 | - | - | - | - | - | - | - | - | - | - | - | - | - | - | - | - | - | - | - | - | - | - | - | - | - | - | ✔ | - | - | - | - | |
| StarPRNT Intelligence for SK | - | - | - | - | - | - | - | - | - | - | - | - | - | - | - | - | - | - | - | - | - | - | - | - | - | - | - | - | - | - | - | |
| Star TSP100 futurePRNT[3] | - | - | - | - | - | - | - | - | ✔ | ✔ | ✔ | ✔ | ✔ | ✔ | ✔ | ✔ | - | - | - | - | - | - | - | - | - | - | - | - | - | - | - | |
| [1] | The memory switch setting cannot be changed. To change the memory switch setting, use the software for Windows. |
| [2] | Only for Android. |
| [3] | The memory switch setting cannot be changed. To change the memory switch setting, use the software for Android or iOS. |
| [4] | iOS version is not available for firmware versions 5.0 and later. |