6.1. ICommandBuilder 移行ガイド(StarPRNT V5搭載機能)
本ページは、プリンターモデル依存を最小限に抑えることを目的とした ICommandBuilder 移行ガイドです。
ICommandBuilder とは、従来のバイナリ形式でのコマンド生成ではなくヒューマンリーダブルなコマンド生成を可能にする機能で、StarPRNT V5.0以降の拡張ライブラリ(以降、 StarIOExtension )に搭載しています。
今までは開発者がプリンターエミュレーションの仕様を理解した上でコマンドを生成しなければいけませんでしたが、本機能により学習コストを抑えることができ、機種追加時の工数削減も期待できます。
本ページを参考に ICommandBuilder をご活用ください。
6.1.1. 必要な作業内容一覧
ICommandBuilder への移行とプリンターモデルの追加に必要な作業は以下です。
重要
プリンターモデルの組み合わせによっては、 portSettings指定の変更 も必要になります。
6.1.2. StarIOExtension の導入
プロジェクトに StarIOExtension が組み込まれていることを確認してください。 各ライブラリは同一SDKバージョンの物をご利用ください。
Nugetパッケージ
winmdファイルを使用する場合の一覧
StarIOPort.winmd
StarIO_Extension.winmd
SMCloudServices.winmd
ライブラリ導入手順の詳細は、 ライブラリ追加方法 に記載しています。
6.1.3. APIとコマンド作成方法の変更方法(ICommandBuilderの導入)
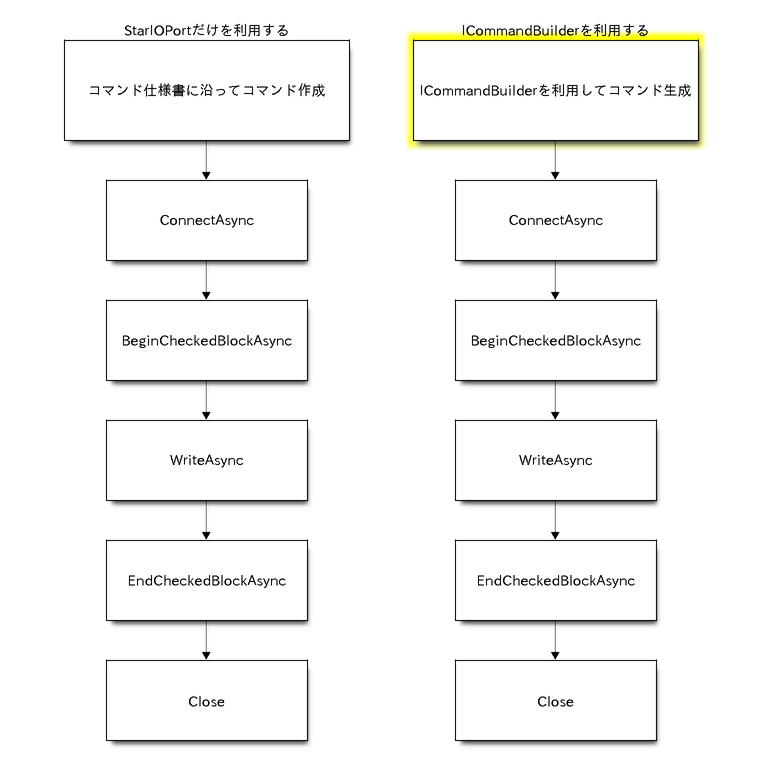
全体フローの違い
下記フローに示すように、 ICommandBuilder の導入にコマンド生成部以外の変更は必要ありません。
印刷データ作成(プリンター内蔵フォント)プログラム上の変更
レシート上の文字に使用されるプリンター内蔵フォント印刷は、以下サンプルのように変わります。実際には利用している機能に合わせて変更をお願いします。
対応している機能の一覧は ICommandBuilder をご確認ください。
注釈
TSP100シリーズはプリンターフォントに対応していません。 印刷データ作成(画像データ)プログラム上の変更 をご確認ください。
string command = "\x1b\x40";       // Initialization
command += "\x1b\x1d\x61\x01";     // Alignment
command += "Hello world";
command += "\x1b\x64\x02";         // Cut paper
ICommandBuilder builder = StarIO_Extension.StarIoExt.CreateCommandBuilder(emulation);

builder.BeginDocument();
builder.AppendAlignment(AlignmentPosition.Right);
builder.AppendData(Encoding.GetEncoding(encoding).GetBytes("Hello world").AsBuffer());
builder.AppendCutPaper(CutPaperAction.PartialCutWithFeed);
builder.EndDocument();

builder.GetCommands()
印刷データ作成(画像データ)プログラム上の変更
レシート上の店舗ロゴなどに使用される画像データ印刷は、以下サンプルのように変わります。実際には利用している機能に合わせて変更をお願いします。
対応している機能の一覧は ICommandBuilder をご確認ください。
BitmapDecoder starLogoBitmapDecoder = await CreateCouponImageAsync("star_logo_image.png");
ICommandBuilder builder = StarIO_Extension.StarIoExt.CreateCommandBuilder(emulation);

builder.BeginDocument();
await builder.AppendBitmapAsync(starLogoBitmapDecoder, true);
builder.AppendCutPaper(CutPaperAction.PartialCutWithFeed);
builder.EndDocument();

builder.GetCommands();
6.1.4. プリンターモデルの追加方法
プリンターモデルの追加や移行をする場合でも、プリンターコマンドの生成に ICommandBuilder を利用しているのであれば、ほとんどのケースはエミュレーション指定の変更だけで完了します。
ただし、一部状況においては追加の変更が必要になるため、下記案内を参考に変更をお願いします。
Emulationの指定方法( ICommandBuilder )
mC-Print3とそれ以外のプリンターでは、搭載しているエミュレーションが異なることがあります。
Emulation のページで対応エミュレーションを確認し、 ICommandBuilder インスタンス生成時にエミュレーション指定を変更してください。
例として、TSP100/TSP650IIとmC-Print3では、下記表に沿ったエミュレーション指定の変更が必要です。
Printer |
Emulation |
|---|---|
TSP650II |
StarLine |
TSP100 |
StarGraphic |
mC-Print3 |
StarPRNT |
// TSP650II (StarLine)
// Emulation emulation = Emulation.StarLine;

// TSP100 (StarGraphic)
// Emulation emulation = Emulation.StarGraphic;

// mC-Print3 (StarPRNT)
Emulation emulation = Emulation.StarPRNT;
ICommandBuilder builder = StarIO_Extension.StarIoExt.CreateCommandBuilder(emulation);
FindAllAsync の検索方法
FindAllAsync によるプリンターの検索方法は同一です。
検索で得られるモデル名をアプリケーション内で何かしらの判別に利用している場合は、対応が必要になります。
例として、検索結果に含まれるプリンターモデル名は下記の通りです。
LANインターフェース
Printer
Model Name (ProductInformation)
mC-Print2
"MCP21", "MCP20"
mC-Print3
"MCP31", "MCP30"
mC-Label3
"MCL32"
TSP100IV
"TSP143IV"
TSP100IV SK
"TSP143IV"
TSP100IIILAN
"TSP143IIILAN", "TSP143IIIW"
TSP650II
"TSP654"
TSP700II
"TSP743II"
TSP800II
"TSP847II"
SP700
"SP712", "SP742", "SP717", "SP747"
Bluetoothインターフェース
Printer
Model Name (ProductInformation)
mC-Print2
"mC-Print2-XXXXX"
mC-Print3
"mC-Print3-XXXXX"
mC-Label3
"mC-Label3-XXXXX"
mPOP
"STAR mPOP-XXXXX"[1], "mPOP-XXXXX"[2] TSP100III
"TSP100-XXXXX"
TSP650II
"Star Micronics"
TSP700II
"Star Micronics"
TSP800II
"Star Micronics"
SP700
"Star Micronics"
SM-S210i
"Star Micronics"[3], "SM-S210I-XXXXX"[4] SM-S230i
"Star Micronics"[3], "SM-S230I-XXXXX"[4] SM-T300
"Star Micronics"[3], "SM-T300-XXXXX"[4] SM-T300i
"Star Micronics"[3], "SM-T300i-XXXXX"[4] SM-T400i
"Star Micronics"[3], "SM-T400i-XXXXX"[4] SM-L200
"Star Micronics"
SM-L300
"Star Micronics"
XXXXX : 製品ごと異なる5桁の識別番号
| [1] | POP10の場合 |
| [2] | POP10CBIの場合 |
| [3] | ファームウェアバージョン5.0未満 |
| [4] | ファームウェアバージョン5.0以降 |
ConnectAsync - portName引数の指定方法
portName の指定に FindAllAsync の戻り値( ProductInformation )を利用している場合、引数の変更は必要ありません。
ただし、引数を直接設定(固定値など)している場合は、デバイス名の初期値がmC-Print3とそれ以外で異なるため、引数を変更しなければいけない可能性があります。
例として、TSP100/TSP650IIとmC-Print3の初期値は下記の通りです。
Printer |
Bluetooth DeviceName |
|---|---|
TSP100 |
"TSP100-XXXXX" |
TSP650II |
"Star Micronics" |
mC-Print3 |
"mC-Print3-XXXXX" |
XXXXX : 製品ごと異なる5桁の識別番号
StarIOPort.Port port = new StarIOPort.Port();

string portSettings = "";

// TSP650II (Bluetooth)
// string portName = "BT:Star Micronics";

// TSP100 (Bluetooth)
// string portName = "BT:TSP100-XXXXX";

// mC-Print3 (Bluetooth)
// string portName = "BT:mC-Print3-XXXXX";

// No changes required if used "BT:"
string portName = "BT:";

await port.ConnectAsync(portName, portSettings);
その他インターフェース
プリンター固有のデバイス名はありません。 ConnectAsync のページを参考に、インターフェースごと適切な portName を設定してください。
ConnectAsync - portSettings引数の指定方法
各プリンターモデルで適用すべき識別子が異なることがあります。 ConnectAsync のページ「2. portSettings 引数」を参考に変更してください。
例として、TSP100/TSP650IIとmC-Print3の portSettings は同一です。
Printer |
portSettings |
|---|---|
TSP100 |
"" |
TSP650II |
"" |
mC-Print3 |
"" |
StarIOPort.Port port = new StarIOPort.Port();
string portName = "BT:";

// string portSettings = "l10000"
string portSettings = "";

await port.ConnectAsync(portName, portSettings);
印字領域の指定方法
プリンターモデルの組み合わせによっては印字領域設定の初期値が異なります。必要に応じて AppendPrintableArea で領域を指定してください。
AppendBitmapAsync などを用いてグラフィックデータを印刷している場合は、移行先プリンターモデルの印字領域に合わせてレイアウト変更をお願いします。
6.1.5. コマンド生成からデータ送信までのコード上の流れ
コマンド生成から書き込みまでの一連です。実際には下記関数を非UIスレッドで実行してください。
public async Task<Result> printSample()
{
    Result result = Result.ErrorUnknown;
    try
    {
        Emulation emulation = Emulation.StarPRNT;
        ICommandBuilder builder = StarIO_Extension.StarIoExt.CreateCommandBuilder(emulation);
        builder.BeginDocument();
        builder.AppendAlignment(AlignmentPosition.Right);
        builder.AppendData(Encoding.GetEncoding(encoding).GetBytes("Hello world").AsBuffer());
        builder.AppendCutPaper(CutPaperAction.PartialCutWithFeed);
        builder.EndDocument();

        IBuffer buffer = builder.GetCommands()

        using (StarIOPort.Port port = new StarIOPort.Port())
        {
            result = Result.ErrorOpenPort;

            String portName = "BT:";
            String portSettings = "";

            await port.ConnectAsync(portName, portSettings);

            StarIOPort.Status status;

            result = Result.ErrorBeginCheckedBlock;
            status = await port.BeginCheckedBlockAsync();

            if (status.Offline == true)
            {
                string message = "Printer is Offline.";

                if (status.ReceiptPaperEmpty == true)
                {
                    message += "\nPaper is Empty.";
                }
                if (status.CoverOpen == true)
                {
                    message += "\nCover is Open.";
                }
                throw new Exception(message);
            }

            result = Result.ErrorWritePort;
            if (await port.WriteAsync(buffer) != buffer.Length)
            {
                throw new Exception("WriteAsync failed.");
                }

            result = Result.ErrorEndCheckedBlock;
            status = await port.EndCheckedBlockAsync();

            if (status.Offline == true)
            {
                string message = "Printer is Offline.";


                if (status.ReceiptPaperEmpty == true)
                {
                    message += "\nPaper is Empty.";
                }
                if (status.CoverOpen == true)
                {
                    message += "\nCover is Open.";
                }
                throw new Exception(message);
            }
            result = Result.Success;
        }
    }
    catch (Exception)
    {
    }
    return result;
}