FAQ
If you have any troubles during use, please check the following before contacting us.
Items to Check First
When there is a problem with the wireless connection, check the following items in order from the top. If any of the items applies to your circumstances, perform the correction.
1) Check the LED display of the Wireless LAN Unit.
If the POWER LED is not lit
Check that the USB cable is correctly connected to the printer.
- Check that the printer to which the USB cable is connected is turned on, and that the cable is connected to the correct port.
* For details, check the online manual of the printer that you are using. - Check that both cables connecting the Wireless LAN Unit and printer are not loose.
If the WLAN LED is not lit or is flashing at irregular intervals
Some time may be required until device operation stabilizes after the power is turned on. (around 30 to 60 seconds)
Before connecting and configuring settings, check that the WLAN LED is lit or flashing slowly.
If the LAN1/LAN2 LED are not lit
Check that the LAN cable is connected correctly.
- Check the LAN cables of both the Wireless LAN Unit and the network device are not loose.
- Check that the LAN cable is not damaged.
If the LAN1/LAN2 LED does not light even after the LAN cable is reconnected, connect another LAN cable and check.
2) Check the Wi-Fi settings of the setup device.
Check the Wi-Fi settings of the smartphone, tablet, PC, or other setup device that will connect to the Wireless LAN Unit and printer.
- Is the Wi-Fi turned on?
- Is the device connected to the correct network?
Try restarting the setup device.
3) Check the access point SSID.
Check that the access point SSID does not contain any characters which cannot be used.
Below characters cannot be used in the SSID.
? " $ [ ¥ \ +
Below characters cannot be used at the beginning of the SSID.
! # ; Space
The end of the SSID cannot contain a Space.
4) Check that the network which you want to connect to is operating correctly.
Check the Wireless LAN Unit, printer, network that you want to connect the device to, access point, router, and other network devices.
- Are other wireless network devices operating normally?
- Is the power turned on?
- Are the LED illuminated correctly?
- Check that the cable of the network device is connected and there is no looseness or damage.
If the problem with the wireless connection has not been resolved after checking and correcting the above items, consult with the network administrator and try restarting the network device.
Trouble When Using the Utility
The message “Could not confirm that the settings were applied” is displayed.
This message is displayed when the Wireless LAN Unit cannot be detected on the set SSID after the settings were written to the Wireless LAN Unit.
In addition to the Items to Check First, the following causes are also possible.
- The input SSID password was incorrect when the initial settings were configured.
- The Wireless LAN Unit does not have access privileges to the connection destination access point (due to MAC address filtering or other reason).
- The Wireless LAN Unit cannot connect to the connection destination access point (due to the communication distance, obstruction, or other reason).
Check the correct password, the access privileges, remove any physical obstructions, or take other action, and then configure the settings again.
Was this explanation useful?
The message “Could not connect to the Wireless LAN Unit” is displayed.
This message is displayed when it was not possible to connect to the Wireless LAN unit when configuring the settings from the utility.
In addition to the Items to Check First, the following causes are also possible.
- The Wireless LAN Unit is not in its initial conditions from when it was shipped from the factory.
- The Wireless LAN Unit and setup device physically cannot be connected (due to the communication distance, obstruction, or other reason).
- There are past settings remaining in the setup device.
Initialize the Wireless LAN Unit and configure the settings again.
Initialize Communication Settings Connect the Printer
If the same error is displayed even after initializing the settings, remove any physical obstructions or take other suitable action, and then configure the settings again.
Connect the Printer
If the same message is displayed again after performing the above actions, the reason may be that there is information from a past connection remaining in the setup device.
Follow the procedure below and erase the past connection information.
- Open [Settings] - [Network & internet] - [Wi-Fi].
- In the SSID list, press and hold the SSID of the Wireless LAN Unit to be configured, and then select [Delete].
* This is the procedure for Pixel (Android Version 11). For other models, the UI display may be different, however the same operations should be performed.
Was this explanation useful?
Trouble During Operation
Printing is not possible even though the Wireless LAN Unit LEDs are illuminated normally.
In addition to the Items to Check First, the following causes are also possible.
- The setup device, Wireless LAN Unit, and printer are not all configured for the same network.
- Printer trouble
- Incorrect settings of the printing app
The network which the setup device is connected to may unintentionally be changed in some cases. The static IP address set for the printer may be incorrect.
Check that all devices are on the same network.
There may be paper feed trouble or other problem on the printer side.
Check the FAQ of the online manual for the printer you are using.
mC-Label3 Online Manual “FAQ”
mC-Print3 Online Manual “FAQ”
mC-Print2 Online Manual “FAQ”
TSP100IV Online Manual “FAQ”
TSP100IV SK Online Manual “FAQ”
Also check that the printer connection destination information is set correctly in the printing app that you are using.
Was this explanation useful?
The wireless connection is frequently lost or the communication speed is particularly slow.
The following causes are possible.
- The Wireless LAN Unit is installed at a location distant from the access point. There is an obstruction present.
- There are many wireless communication devices in the surrounding area and radio interference is occurring.
- Communication is being affected by a powerful radio device in the nearby area.
Consider the following actions.
- Install the Wireless LAN Unit as close as possible to the access point, and in a location where there are few obstructions.
- Install in a location as far as possible from devices that produce radio interference.
- Use the channel that is farther from the frequency bands of radio interference.
- Of the 2.4 GHz and 5 GHz channels, use the one that is less likely to produce radio interference.
Changing the Wireless LAN Unit installation position or direction may improve communications.
If the Wireless LAN Unit is used in infrastructure mode, check the settings at the master router for the frequency band and channel to be used.
When using the Wireless LAN Unit in access point mode, the settings can be changed using the utility.
The utility can be used to check the signal strength of the Wireless LAN Unit and the connected access point.
For details, refer to Wireless LAN Unit signal strength.
The communication status of the wireless network will be affected by the surrounding radio wave environment, the presence or absence of obstacles, the installation environment. Perform a thorough evaluation when installing this product.
Was this explanation useful?
The POWER LED illuminates but the WLAN LED does not illuminate or flash.
The following causes are possible.
- The connection destination router is using a channel that is not supported by the Wireless LAN Unit.
Change the CH setting of the master router to a setting within the range supported by the Wireless LAN Unit.
| Model | Supported channels |
|---|---|
| MCW10 WHT C01 | 2.4GHz 5GHz |
| MCW10 WHT C02 | 2.4GHz 5GHz |
| MCW10 WHT C03 | 2.4GHz 5GHz |
*1: Outdoor use is prohibited (Canada).
*2: Outdoor use is prohibited (EU/UK/Australia/New Zealand).
*3: Outdoor use is prohibited (EU/UK/Australia).
*4: Outdoor use is prohibited.
* The 5 GHz channels W53 and W56 are not supported in access point mode.
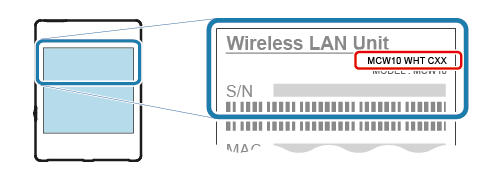
* Check the model name from the part indicated by the red box in the illustration below (rear of the product).
Was this explanation useful?
Other Questions
Communication distance
It has been confirmed that the Wireless LAN Unit is fully capable of communicating over a distance of 30 m, however because the communication distance varies depending on the surrounding radio environment, obstructions, the installation environment, and other factors, conduct a full evaluation when installing.
Was this explanation useful?
Setting a static IP address for the Wireless LAN Unit
The utility can be used to set a static IP address for the Wireless LAN Unit.
When using iOS or Android
Configure the setting from [Change Printer Settings] - [Wireless LAN Unit Detailed Settings] of the Star Quick Setup Utility.
When using Windows
Configure the setting from [Wireless LAN Unit Detailed Settings].
Connect the Printer
Was this explanation useful?
Repair of the Wireless LAN Unit
This product cannot be repaired at the component level.
If a malfunction occurred, replace the entire Wireless LAN Unit.
For details, contact the dealer where you purchased the product.
Was this explanation useful?
Wireless LAN Unit signal strength
One means of checking the status of communications between the Wireless LAN Unit and the connection destination access point is by using the signal strength.
The signal conditions are better when the strength is closer to 0. Maximum strength is at -30 dBm and wireless communications may become unstable at -70 dBm or below.
The signal strength is only a guide. It cannot be used to check for radio interference, noise, or similar factors. Evaluate the actual environment and make an overall decision.
Follow the procedure below to check the signal strength.
When using iOS or Android
- Tap the Star Quick Setup Utility.
- Tap [Change Printer Settings].
- Tap [Wireless LAN Unit Detailed Settings].
“Signal Strength” is displayed in the status area at the top of the screen.
When using Windows
- From the Windows Start menu, open [Star Windows Software] - [Wireless LAN Utility].
- Click on [Wireless LAN Unit Detailed Settings].
“Signal Strength” is displayed in the status area at the top of the screen.
Connect the Printer
Was this explanation useful?
The printer that is connected to the Wireless LAN Unit cannot acquire an IP address.
If the DHCP server function setting of the router that is used is set to “Return DHCP Discover packet response by Unicast”, the printer will be unable to acquire an IP address.
Change the DHCP server setting to “Return DHCP Discover packet response by Broadcast” to enable the printer to acquire an IP address.
Was this explanation useful?