Use Star CloudPRNT
Star CloudPRNT is a protocol that can print from a remote server.
In order to use Star CloudPRNT, it is necessary to prepare a web app that supports the Star CloudPRNT protocol. For details, refer to theStar CloudPRNT Protocol Developer’s Guide.
This section explains the printer-side settings that are necessary in order to use Star CloudPRNT with TSP100IV.
Setup procedure
Setup is performed from the printer settings screen (Web Configuration).
On the settings screen, it is necessary to save each of the setting items individually.
Depending on the usage environment, it may be necessary to set (change) the DNS servers. Perform this procedure separately. Advanced Settings (LAN)
1. Open the printer settings screen
- Connect the printer to the same network as a PC, tablet, or smartphone that will be used for setup. Connect LAN Cable
- Check the printer IP address. Check Printer IP Address
- Open the printer settings screen (Web Configuration) via a web browser such as Google Chrome or Safari. Open Printer Settings Screen
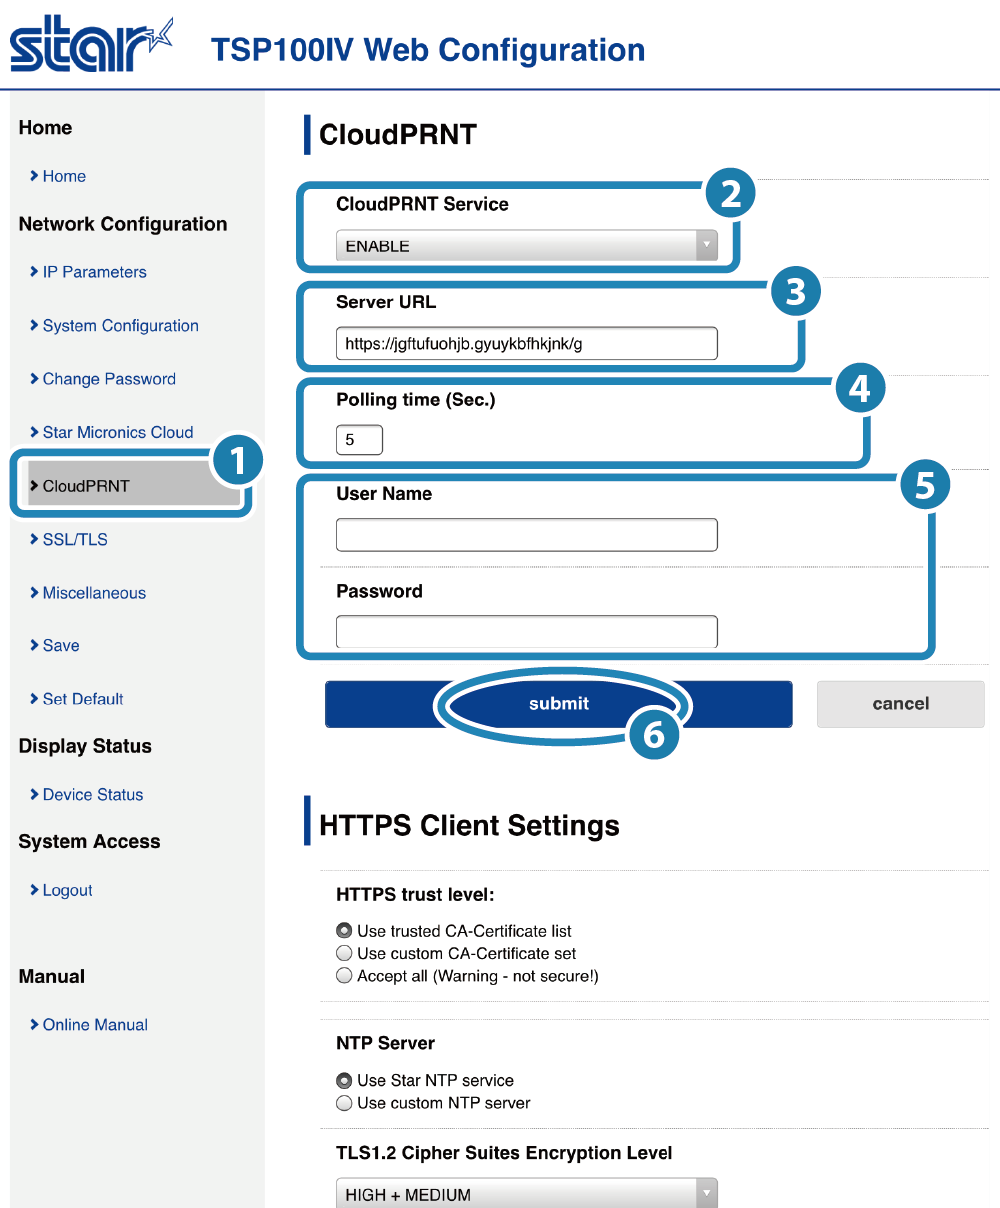
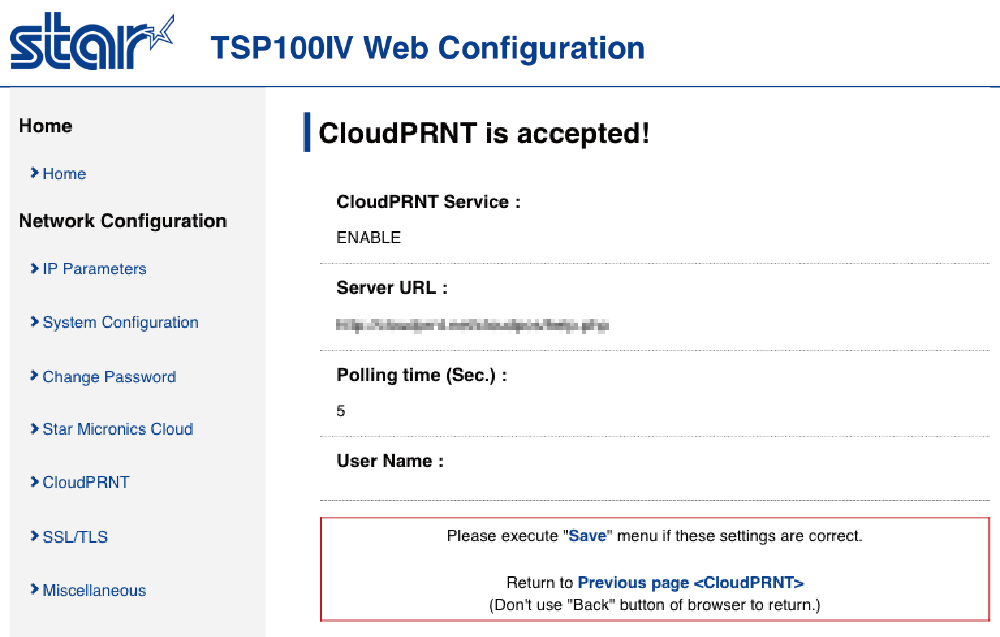
2. Enable the CloudPRNT setting
- From the menu or the menu button
 at the upper left of the screen, open [CloudPRNT]
  and set CloudPRNT Service
  to “ENABLE”.
 - Enter the CloudPRNT server URL in Server URL
 .
.
CloudPRNT Version MQTT* determines the communication protocol based on this URL. - Enter the polling time in Polling time
 .
. - Enter the user name and password in User Name and Password
 .
.
(Input is not necessary unless requested by the CloudPRNT server.) - Tap [Submit]
 .
.
Note
Printer firmware version 2.2 or later supports CloudPRNT Version MQTT*. Update the firmware if necessary.
The firmware version can be checked by the Self-Printing function of the printer. Self-Printing
The firmware can be updated with the utility. Use App
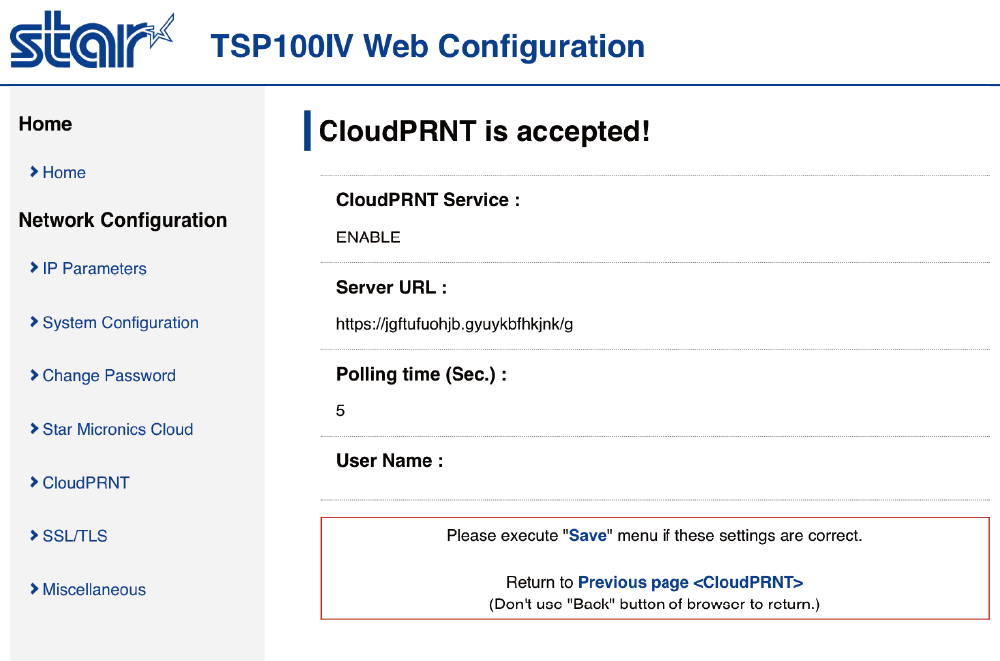
- A screen where you can check and save the entered details will appear.
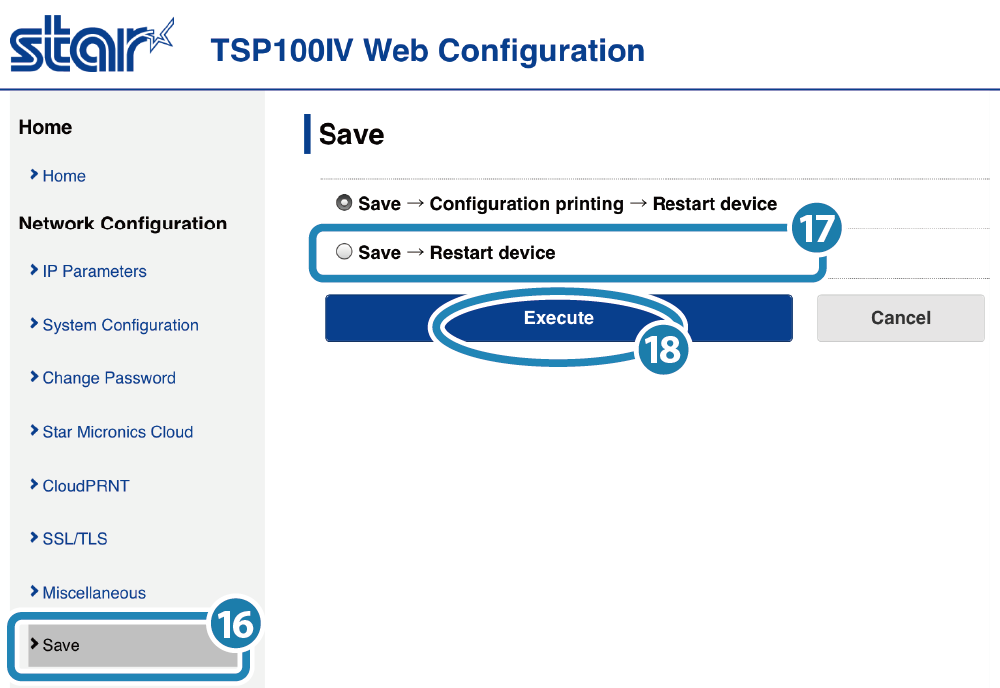
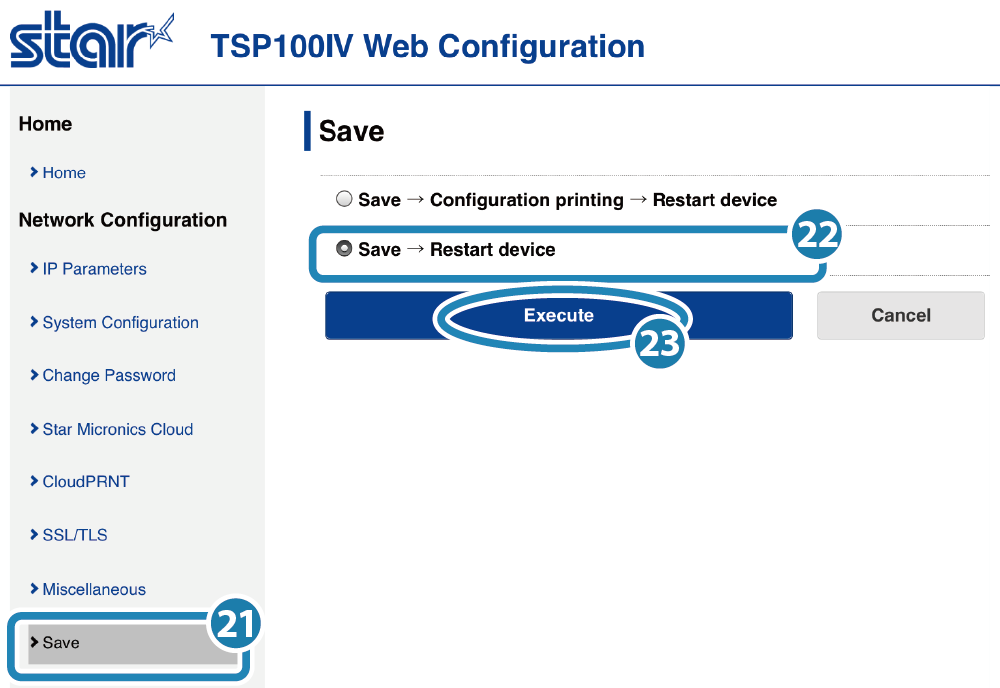
3. Save the settings to the printer
- From the menu or the menu button at the upper left of the screen, open [Save]
 , select SaveRestart device
  and tap [Execute]
  .
.
The settings are saved to the printer.

Note
If the Star CloudPRNT server does not use HTTPS/MQTTS, then setup is now completed.
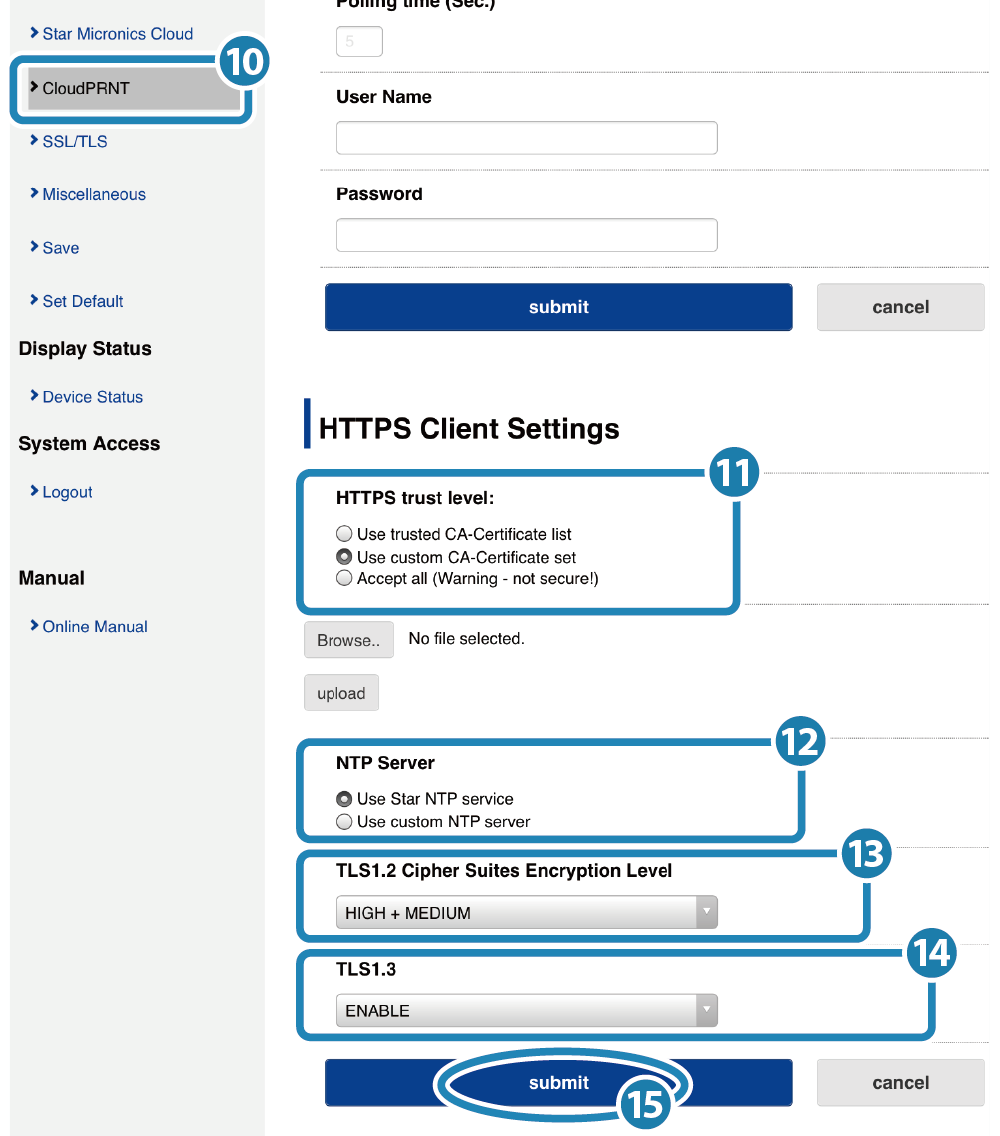
4. If the CloudPRNT server uses HTTPS/MQTTS, check the security settings
- From the menu or the menu button at the upper left of the screen, open [CloudPRNT]
 .
. - Select the HTTPS trust level
 according to the CA-Certificate that is used.
When setting a custom CA-Certificate, file upload will be performed in Step 6. - To specify the specific server for NTP Server
 , select “Use custom NTP server” and enter the URL of the server to use.
 - Specify the TLS1.2 Cipher Suites Encryption Level (printer's cipher suite encryption level)
 according to the support conditions of the server where loudPRNT will operate.
When this item is set to “MEDIUM”, it may be possible to shorten the time before printing starts.
For a list of cipher suites supported by each level, refer to Cipher Suite Support List. - Enable/disable TLS1.3.

When this item is set to “DISABLE”, it may be possible to shorten the time before printing starts.
For a list of supported cipher suites, refer to Cipher Suite Support List. - Tap [Submit]
 .
.
Note
or TLS1.3 setting, consider the setting change carefully in advance because doing so will lower the security level from the initial settings.- A screen where you can check and save the entered details will appear.

5. Save the settings to the printer
- From the menu or the menu button at the upper left of the screen, open [Save]
 , select SaveRestart device
  and tap [Execute]
  .
.
The settings are saved to the printer.
Note
If a custom CA-Certificate was selected for the HTTPS trust level in Step 4, proceed to Step 6.
If a custom CA-Certificate was not selected, setup is now completed.
6. Upload the custom CA-Certificate
- From the menu or the menu button at the upper left of the screen, open [CloudPRNT]
 .
. - Tap the [Browse..] button and open the select file screen (dialog box), select the CA-Certificate (PEM format), and tap [upload].

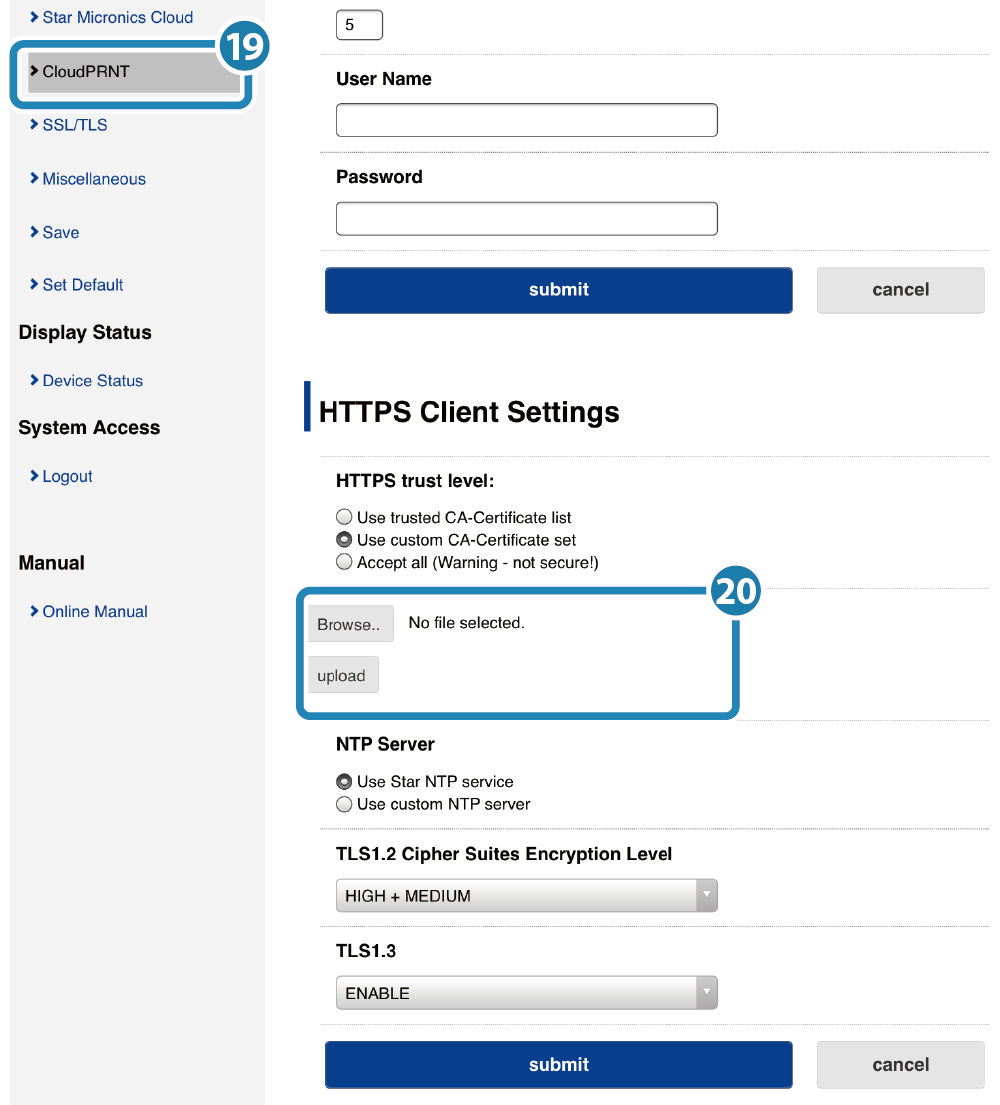
- A screen where you can check and save the entered details will appear.
7. Save the settings to the printer
- From the menu or the menu button at the upper left of the screen, open [Save]
 , select SaveRestart device
  and tap [Execute]
  .
.
The settings are saved to the printer.
- Setup is now completed.