Connect USB Cable
Connect the USB cable for communication between mPOP and the tablet, smartphone, PC, or other device via USB.
When connecting a tablet, smartphone, or other device for the purpose of charging, and when connecting a USB-compatible product (such as BCR-POP1), refer to Set Up External Devices.
Bluetooth and USB-B cannot be connected simultaneously for the host device.
When switching to a USB connection after a Bluetooth connection, turn off the mPOP power, connect the USB cable used for communication connection, and then turn the mPOP power on.
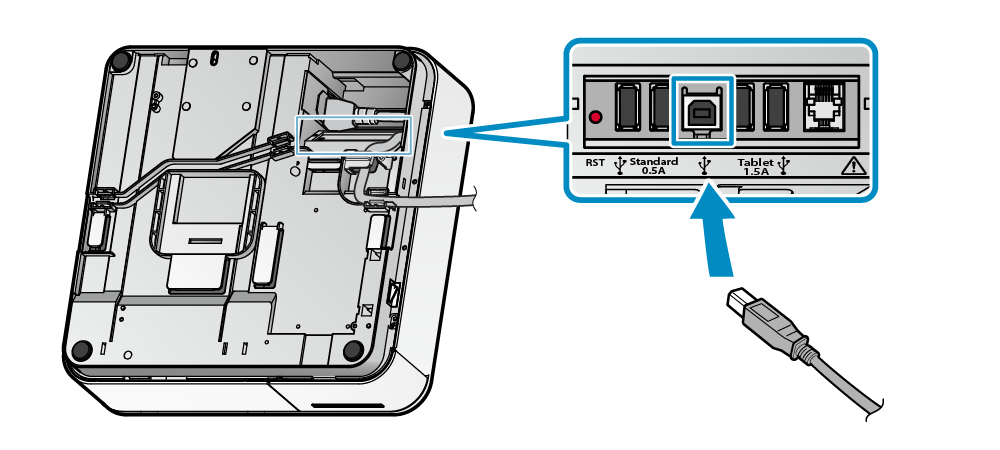
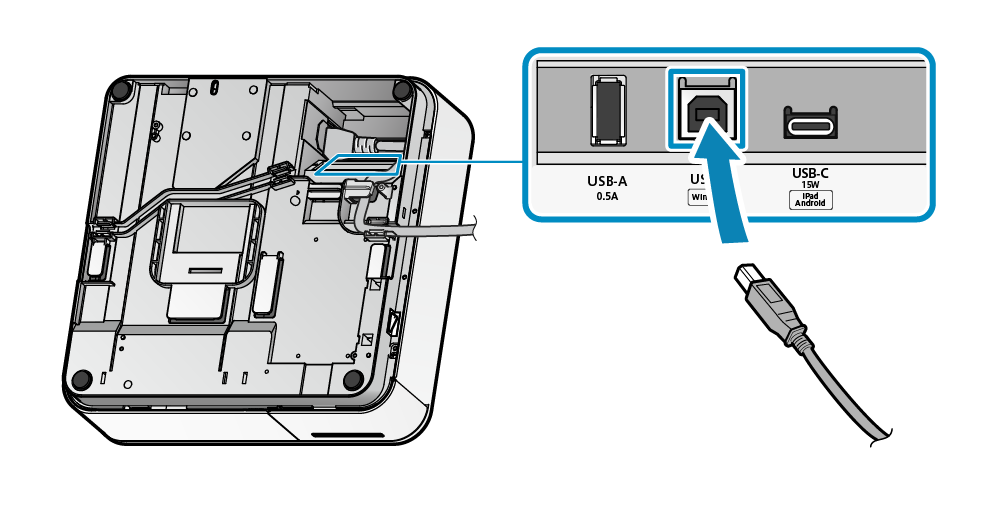
USB-B Port
When communicating (printing) from a PC/tablet/smartphone /other device (Windows/Mac/Linux/Android), follow the procedure below to connect to the USB-B port of the printer.
The USB-B port supports communication only. When connecting a tablet, smartphone, or other device for the purpose of charging it, use the USB-A port (Tablet 1.5A).
Set Up External Devices: USB-A Port
When using a PC, install the correct driver for the environment where the product is used. Install Driver
Caution
When performing USB communication with a device equipped with USB-C or USB micro-B, it is necessary to use a USB conversion adapter. Some devices may not support the use of a USB conversion adapter. Be sure to perform full operation checks in advance before using.
1. Prepare a USB cable and USB conversion adapter
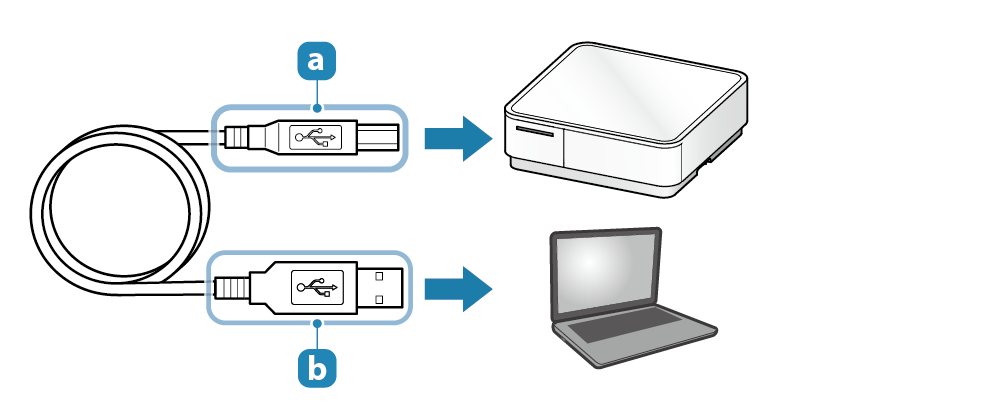
- Prepare the USB cable (B-A) that was provided with the product.
- Prepare the included USB cable (B-A) and USB conversion adapter.
When using USB-A as the connection port on the PC, tablet, smartphone side
 | Printer-side plug | USB-B |
 | Device-side plug | USB-A |
When using USB-C or USB micro-B as the connection port on the PC, tablet, smartphone side
| Printer-side plug | USB-B |
| Device-side plug | USB-C or USB micro-B |
 | USB conversion adapter | A → C or A → micro-B |
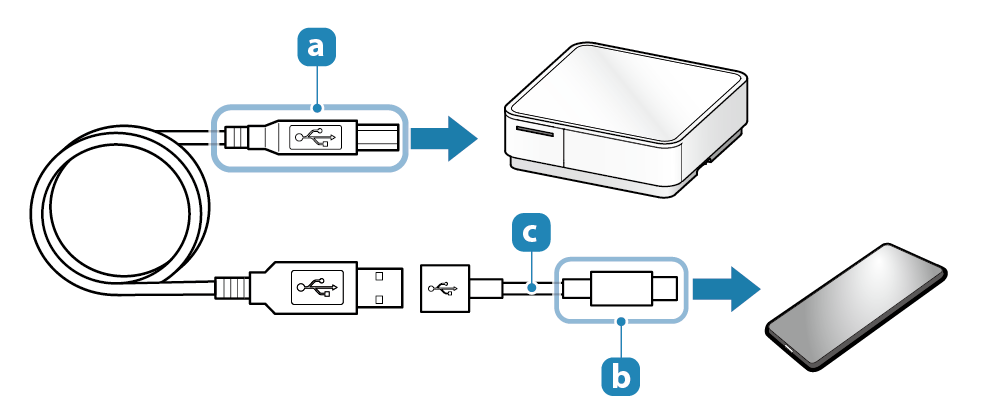
2. Connect the USB cable
- Connect the USB cable to the USB-B port located on the bottom of the mPOP unit.
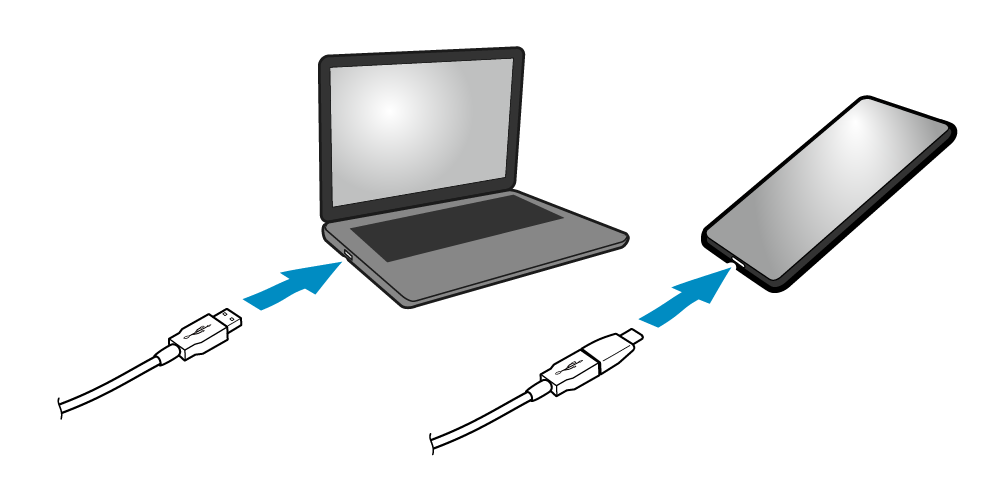
3. Connect the USB cable to the PC/tablet/smartphone
- Connect the other plug to the PC/tablet/smartphone.
4. Route the USB cable
- There are 2 cable outlets to the right and left, and the cable can be routed according to where the main unit and the connected devices are placed.
For details, refer to Connect Cables.
Caution
Communication connection between the USB-C port and Android devices is available for mPOP firmware version 5.0 or later.
The mPOP firmware version can be checked using the Self-Printing function. Self-Printing
The firmware can be updated with the special app. Use App
Connect the USB cable for communication or communication + charging between mPOP and the tablet, smartphone, PC, or other device via USB.
When connecting a tablet, smartphone, or other device only for the purpose of charging, and when connecting a USB-compatible product (such as BCR-POP1), refer to Set Up External Devices.
USB-C and USB-B cannot be connected simultaneously for the host device.
Make appropriate connections to suit your environment.
Prepare USB Cable
The USB cable used for connection varies depending on the operating system of your PC/tablet/smartphone.
Prepare a cable appropriate for the device you are using.
When using a cable that is available commercially, be sure to fully verify operation before beginning actual use.
USB cable (C-C)
| Printer-side plug | USB-C | 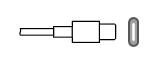 |
| Device-side plug | USB-C | |
- Prepare a cable that conforms to the USB2.0 standard, supports current of 3.0 A or higher, and is no longer than 2 m.
Next step
USB cable (C-Lightning)
| Printer-side plug | USB-C | |
| Device-side plug | Lightning | 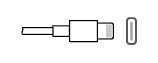 |
- Prepare an Apple Inc.'s genuine product or an MFi-certified product that is no longer than 2 m.
Next step
USB cable (C-USB micro-B)
| Printer-side plug | USB-C | |
| Device-side plug | USB micro-B | 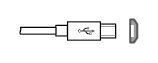 |
- Prepare a cable that conforms to the USB2.0 standard and is no longer than 2 m.
Next step
USB cable (B-A)
| Printer-side plug | USB-B | 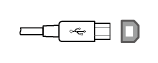 |
| Device-side plug | USB-A | 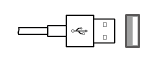 |
- Prepare a cable that comes with the device or that conforms to the USB2.0 standard and is no longer than 2 m.
Note
In the case of the USB cable (B-A), it is used only for communication but does not conduct charging from the printer.
Next step
USB cable (B-A) and USB conversion adapter
| Printer-side plug | USB-B | |
| Device-side plug | USB-A and USB conversion adapter | 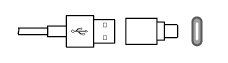 |
- Prepare a cable that comes with the device or that conforms to the USB2.0 standard and is no longer than 2 m.
Note
In the case of the USB cable (B-A), it is used only for communication but does not conduct charging from the printer.
Next step
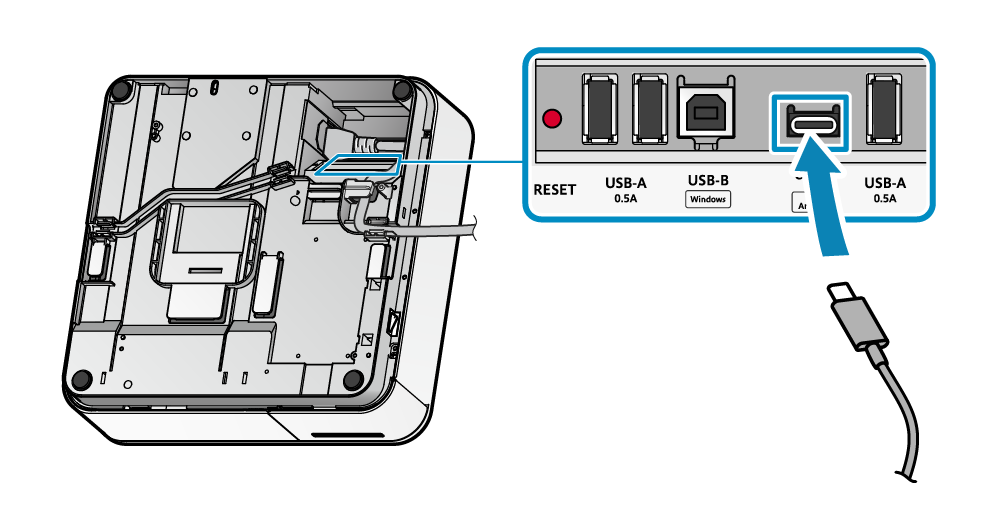
USB-C Port
When printing with mPOP through the USB-C port, make sure that no USB cable is connected to the USB-B port.
Caution
When a Windows or Android device is also connected to the USB-B port at the same time, only power supply to the USB-C port is performed and no communication takes place.
1. Connect the USB cable to mPOP
- Connect the USB cable to the USB-C (15 W) located on the bottom of the mPOP unit.
- When re-connecting the USB cable after disconnecting, disconnect the cable and wait for 2 seconds or longer before re-connecting.
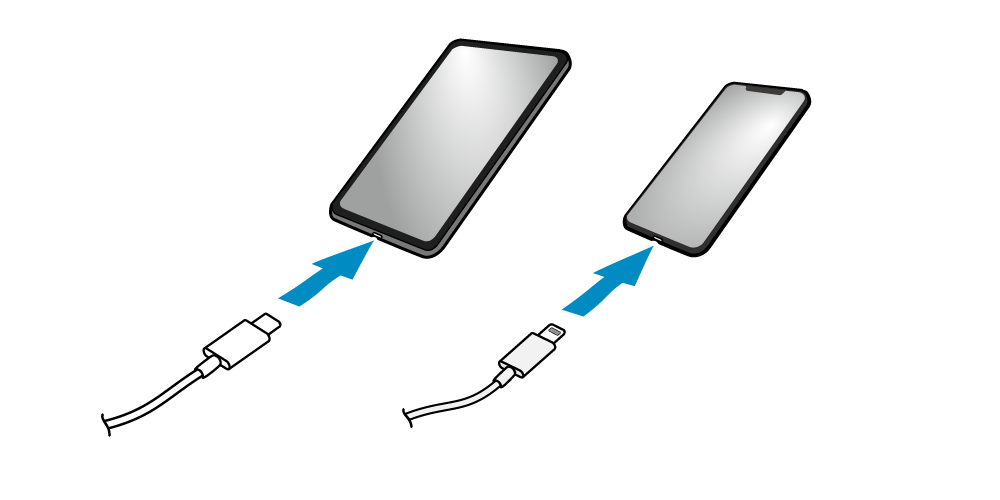
2. Connect the USB cable to the tablet or smartphone
- Connect the other plug to the tablet or smartphone.
3. Route the USB cable
- There are 2 cable outlets to the right and left, and the cable can be routed according to where the main unit and the connected devices are placed.
For details, refer to Connect Cables.
Caution
When using an Android device
Devices with Android OS version 9.0 or later are supported.
When connecting an Android device for the purpose of communication, start the Android device, connect the USB cable to mPOP, and then turn ON the mPOP power.
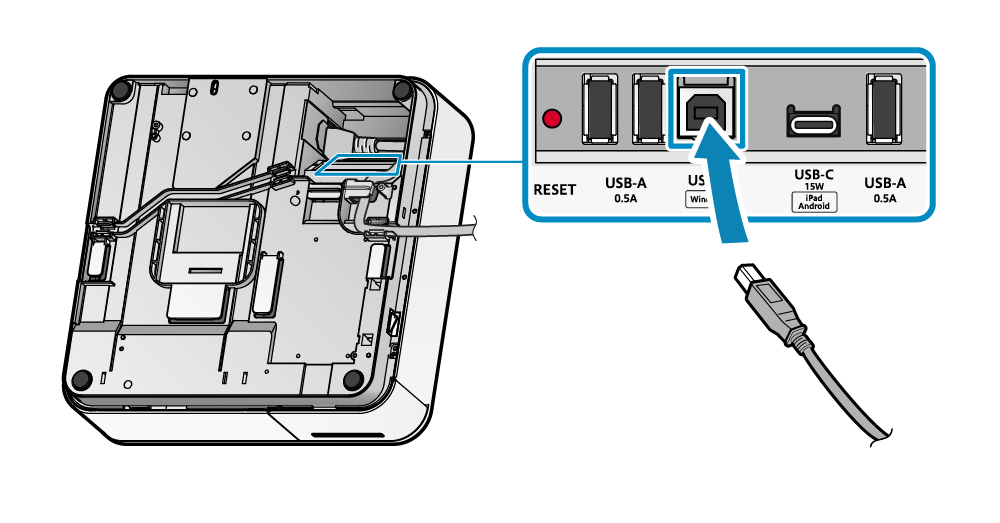
USB-B Port
When communicating (printing) from a PC/tablet/smartphone /other device (Windows/Mac/Linux/Android), follow the procedure below to connect to USB-B of the printer.
The USB-B port supports communication only. When connecting a tablet, smartphone, or other devices for the purpose of charging it, use USB-C (15 W).
Set Up External Devices: USB-C Port
When using a PC, install the correct driver for the environment where the product is used. Install Driver
Caution
When performing USB communication with a device equipped with USB-C or USB micro-B, it is necessary to use a USB conversion adapter. Some devices may not support the use of a USB conversion adapter. Be sure to perform full operation checks in advance before using.
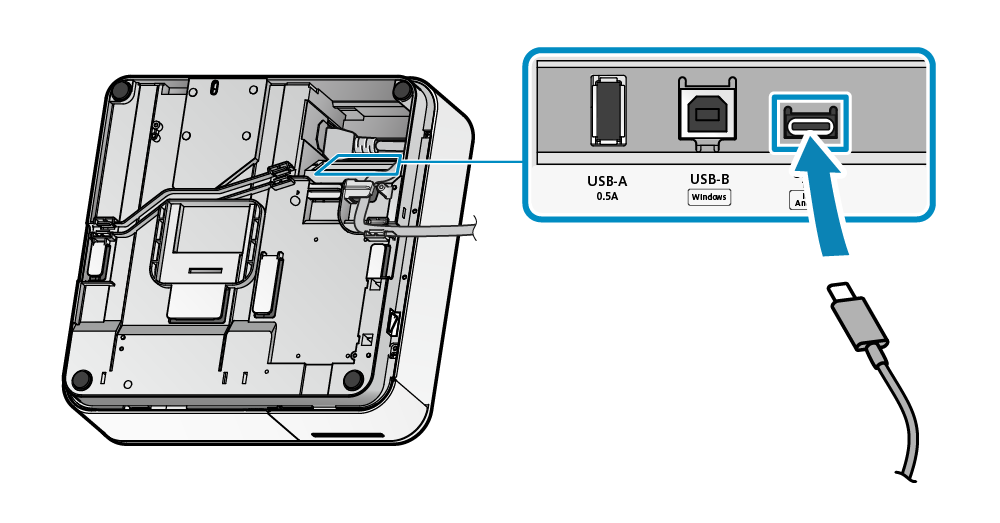
1. Connect the USB cable to mPOP
- Connect the USB cable to the USB-B port located on the bottom of the mPOP unit.
2. Connect the USB cable to the PC, tablet, or smartphone
- Connect the other plug to the PC, tablet, or smartphone.
3. Route the USB cable
- There are 2 cable outlets to the right and left, and the cable can be routed according to where the main unit and the connected devices are placed.
For details, refer to Connect Cables.
Connect the USB cable for communication or communication + charging between mPOP and the tablet, smartphone, PC, or other device via USB.
When connecting a tablet, smartphone, or other device only for the purpose of charging, and when connecting a USB-compatible product (such as BCR-POP1), refer to Set Up External Devices.
Bluetooth, USB-C, and USB-B cannot be used simultaneously for the host device.
Only one type of interface can be used for printing communication.
When switching to a USB connection after a Bluetooth connection with another device, turn off the mPOP power, connect the USB cable used for communication connection, and then turn the mPOP power on.
Prepare USB Cable
The USB cable used for connection varies depending on the operating system of your PC, tablet, or smartphone.
Prepare a cable appropriate for the device you are using.
When using a cable that is available commercially, be sure to fully verify operation before beginning actual use.
USB cable (C-C)
| Printer-side plug | USB-C | |
| Device-side plug | USB-C | |
- Prepare a cable that conforms to the USB2.0 standard, supports current of 3.0 A or higher, and is no longer than 2 m.
Next step
USB cable (C-Lightning)
| Printer-side plug | USB-C | |
| Device-side plug | Lightning | |
- Prepare an Apple Inc.'s genuine product or an MFi-certified product that is no longer than 2 m.
Next step
USB cable (C-USB micro-B)
| Printer-side plug | USB-C | |
| Device-side plug | USB micro-B | |
- Prepare a cable that conforms to the USB2.0 standard and is no longer than 2 m.
Next step
USB cable (B-A)
| Printer-side plug | USB-B | |
| Device-side plug | USB-A | |
- Prepare a cable that conforms to the USB2.0 standard and is no longer than 2 m.
Note
In the case of the USB cable (B-A), it is used only for communication but does not conduct charging from the printer.
Next step
USB cable (B-A) and USB conversion adapter
| Printer-side plug | USB-B | |
| Device-side plug | USB-A and USB conversion adapter | |
- Prepare a cable that conforms to the USB2.0 standard and is no longer than 2 m.
Note
In the case of the USB cable (B-A), it is used only for communication but does not conduct charging from the printer.
Next step
USB-C Port
When communicating (printing) with mPOP through the USB-C port, make sure that no USB cable is connected to the USB-B port.
Caution
When a Windows or Android device is also connected to the USB-B port at the same time, only power supply to the USB-C port is performed and no communication takes place.
1. Connect the USB cable to mPOP
- Connect the USB cable to the USB-C (15 W) located on the bottom of the mPOP unit.
- When re-connecting the USB cable after disconnecting, disconnect the cable and wait for 2 seconds or longer before re-connecting.
2. Connect the USB cable to the tablet or smartphone
- Connect the other plug to the tablet or smartphone.
3. Route the USB cable
- There are 2 cable outlets to the right and left, and the cable can be routed according to where the main unit and the connected devices are placed.
For details, refer to Connect Cables.
Caution
When using an iOS device
A single iOS device cannot be connected simultaneously via Bluetooth and USB-C.
When the iOS device is connected to USB-C while a Bluetooth connection is active, Bluetooth will be disconnected and the device will be automatically connected to USB-C.
When using an Android device
Devices with Android OS version 9.0 or later are supported.
When connecting an Android device for the purpose of communication + charging, start the Android device, connect the USB cable to mPOP, and then turn ON the mPOP power.
Be sure not to connect via Bluetooth.
USB-B Port
When communicating (printing) from a PC/tablet/smartphone /other device (Windows/Mac/Linux/Android), follow the procedure below to connect to USB-B of the printer.
When switching to communication using the USB-B port after a Bluetooth connection, turn off the mPOP power, connect the USB-B port and host device, and then turn the mPOP power on.
The USB-B port supports communication only. When connecting a tablet, smartphone, or other device for the purpose of charging it, use USB-C (15 W).
Set Up External Devices: USB-C Port
When using a PC, install the correct driver for the environment where the product is used. Install Driver
Caution
When performing USB communication with a device equipped with USB-C or USB micro-B, it is necessary to use a USB conversion adapter. Some devices may not support the use of a USB conversion adapter. Be sure to perform full operation checks in advance before using.
1. Connect the USB cable to mPOP
- Connect the USB cable to the USB-B port located on the bottom of the mPOP unit.
2. Connect the USB cable to the PC, tablet, or smartphone
- Connect the other plug to the PC, tablet, or smartphone.
3. Route the USB cable
- There are 2 cable outlets to the right and left, and the cable can be routed according to where the main unit and the connected devices are placed.
For details, refer to Connect Cables.